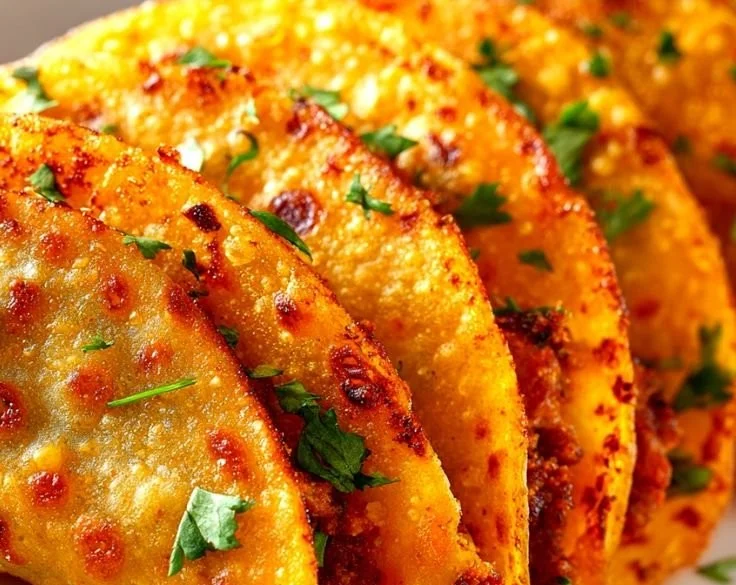
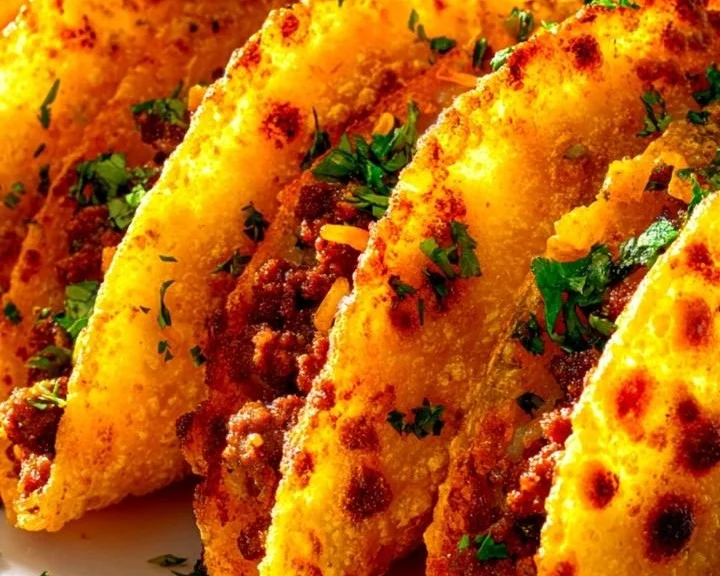
Tacos Dorados: The Ultimate Guide to Crispy Fried Tacos
Tacos Dorados: The Ultimate Guide to Crispy Fried Tacos
Why these tacos get their signature crunch
Understanding what creates a perfect, enduring crunch is the foundation for mastering tacos dorados. Crispness comes from moisture control, the right fat temperature, and tortilla choice—each factor alters texture from immediately fried to long-lasting crunch that holds up under toppings.

For cooks who like simple sides, a quick warm grain or vegan option complements the texture contrast; try pairing with 10-minute vegan burrito wraps when you need a speedy plant-based accompaniment that won’t compete with the fried shells.
Essential ingredients with practical notes
Start with tortillas, filling, oil, and an optional binding agent. Each ingredient influences crispness and flavor.
- Tortillas: Use fresh corn tortillas for authentic flavor and the best snap. Flour tortillas can be used but require lighter frying and careful folding to avoid sogginess.
- Fillings: Shredded chicken, ground beef, refried beans, or mashed potatoes are common; choose fillings that are fully cooked and drained of excess liquid.
- Binding agent: A light smear of mashed potato, cheese, or a small amount of beaten egg can help keep the tortilla sealed and prevent filling leakage during frying.
- Oil: Neutral oils with high smoke points (canola, vegetable, sunflower) produce consistent heat without off-flavors.
- Seasonings: Salt the filling, and add aromatics like onion, garlic, cumin, or oregano for depth—seasoning affects perceived crisp by balancing richness.
Equipment and prep that matter
Proper equipment makes results predictable and repeatable. You don’t need professional gear, but a few items raise success rates dramatically.
- Deep skillet or Dutch oven: A 3–4 inch oil depth helps the shell fry evenly without excessive splashing.
- Thermometer: An instant-read or deep-fry thermometer keeps oil in the 350–365°F range, the sweet spot for crisping without burning.
- Slotted spoon or spider: For safe, efficient frying and draining.
- Paper towels and a cooling rack: Drain first on paper towels, then transfer to a rack so air circulates and prevents steam from softening the shells.
- Tongs and metal spatula: For turning and pressing the folded shells gently as they crisp.
Step-by-step frying method for consistent results
Follow a predictable sequence to convert moist, cooked filling and soft tortillas into golden, crunchy shells.
- Prep the filling: Cook proteins fully, drain liquid, shred or mash finely, and cool to room temperature. Overly hot filling will release steam and soften the shell during frying.
- Warm the tortillas: Heat tortillas briefly on a dry skillet or microwave with a damp towel for 20–30 seconds to make them pliable. Cold, stiff tortillas crack when folded.
- Assemble: Place a thin line of filling along the center, leaving edges clean. Add a small binder (cheese or mashed potato) to seal if needed. Fold into half or roll tightly depending on desired shape.
- Secure edges: Press lightly to remove air pockets. If edges separate during frying, use a toothpick to hold or a light coating of beaten egg to glue seams.
- Heat oil: Bring oil to 350–365°F. Too cool and the tortilla absorbs oil; too hot and it burns before the interior crisps.
- Fry in batches: Don’t crowd the pan. Fry 2–4 at a time, turning once, until evenly golden—about 2–3 minutes total depending on thickness.
- Drain and rest: Lift to a rack placed over paper towels. Resting on a rack prevents steam buildup and preserves crisp texture.
Pro tips to amplify crunch and flavor
Small adjustments during prep and frying produce noticeably better shells and faster cleanup.
- Double-fry lightly: For extra crunch, fry for 90 seconds, cool, then fry again for 30–45 seconds. This sets the shell and reduces oil absorption.
- Use slightly stiffer tortillas: Store-bought tortillas often benefit from a brief oven warming to remove surface moisture before assembly.
- Salt after frying: Salt draws moisture; adding coarse salt immediately after frying seasons without softening the shell during cooking.
- Hold at serving temperature: Keep finished tacos on a low oven rack (200°F) on a cooling rack to stay warm and crisp when serving a crowd.
- Shallow-fry alternative: For less oil, fry in just enough oil to cover halfway and flip, but monitor closely—this method requires careful temperature control.
Common mistakes and how to avoid them
Many home cooks lose crispness through avoidable errors. Anticipate and correct these to improve outcomes on the first try.
- Overfilling: Excess filling releases steam and prevents the shell from sealing—use thin, even portions.
- Frying with wet filling: Drain vegetables, squeeze excess moisture from shredded meats, and cool fillings before assembly.
- Wrong oil temperature: No thermometer? Test by dipping the tortilla edge—in correct oil it should sizzle steadily without smoking.
- Stacking after frying: Piling tacos traps steam and turns shells limp. Use a rack and single layer for holding.
- Not preheating tortillas: Cold tortillas crack; too-wet tortillas won’t crisp properly. Brief warming ensures flexibility and surface dryness.
Variations and filling ideas
Adapt crisp-fried shells to different cuisines and dietary needs without sacrificing texture.
- Classic shredded beef or chicken: Cook low and shred finely; add a touch of oil to keep it from drying out while maintaining low moisture.
- Refried bean and cheese: Mash beans thickly and mix with cheese to act as both filling and sealant—excellent for vegetarian versions.
- Potato and chorizo: Cook and drain the chorizo, then toss with mashed, seasoned potatoes for a hearty filling that binds well.
- Fish or shrimp: Pre-cook seafood, pat dry, and combine with a light slaw on top after frying to avoid sogginess inside the shell.
- Air-fryer approach: Brush lightly with oil and air-fry at 375°F for 6–8 minutes per side for a lower-oil alternative that still yields good crunch.
Storage, reheating, and preserving crispness
Leftovers can stay enjoyable if stored and reheated with care to revive the crunchy texture.
- Short-term storage: Cool completely, then store in a single layer with paper towels in an airtight container for up to 24 hours.
- Longer storage: Freeze assembled but unfried tacos on a tray, then transfer to a bag. Fry or bake from frozen—do not thaw to avoid sogginess.
- Reheating: Re-crisp in a 375°F oven on a wire rack for 6–10 minutes or use a 350°F air fryer for 3–5 minutes. Avoid microwaves; they make shells limp.
Pairings and serving suggestions
Balance crunchy shells with bright, acidic, and cooling elements to cut through fat and enhance mouthfeel.
- Fresh salsas: Pico de gallo or a citrusy tomatillo salsa adds acidity that lifts fried richness.
- Creamy contrasts: Crema, lime crema, or avocado mousse provide cooling counterpoints without making shells soggy if applied just before serving.
- Slaws and pickles: Quick-pickled onions or a cabbage slaw add crunch and brightness and help keep the taco shell crisp when piled on top briefly.
- Side dishes: Light, neutral sides like grilled corn or a simple green salad maintain textural contrast; for a starchier option, try warm noodle sides such as soy sauce fried noodles to add a savory complement.
Frequently asked questions
Answers to common procedural and troubleshooting questions that help you repeat success.
Can I use flour tortillas? Yes. Use small, thin flour tortillas and fry briefly—watch for puffing and uneven browning and reduce oil temperature slightly.
How do I prevent oil splatter? Dry fillings and tortillas thoroughly. Lower tortillas gently into the oil and avoid crowded batches that cause temperature drops and splatter.
Are baked tacos an option? Baked shells won’t reach the same thin, glassy crisp as deep-fried ones but can be close if brushed with oil and baked on a rack at high heat, turning once.
Can I prepare them ahead for a party? Assemble without frying and keep chilled for a few hours. Fry in the final hour and hold in a warm oven on a rack for best results.