
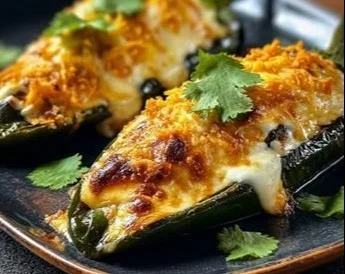
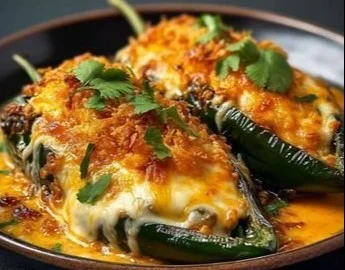
Baked Chili Rellenos
A simple oven method turns classic stuffed poblano peppers into a weeknight-friendly, lighter version without sacrificing the crisp, cheesy interior that defines the dish. This guide covers ingredient choices, step-by-step baking technique, common pitfalls, and ways to adapt the recipe for dietary needs or meal prep.
What makes the oven method stand out
Roasting and baking replace deep-frying, preserving the pepper’s charred flavor while reducing oil and cleanup. Using a light batter or a breadcrumb coating and finishing under the broiler gives a crunchy exterior and fully melted cheese inside. The result is more consistent texture, easier timing for multiple peppers at once, and a safer process in a home kitchen.
Ingredients and smart substitutions
- Poblano peppers (or anaheim for milder heat): choose firm peppers with smooth skin and wide cavities for stuffing.
- Cheese: Oaxaca, Monterey Jack, mozzarella; use a mix for stretch and flavor.
- Filling options: sautéed onions and garlic, seasoned ground pork or turkey, black beans and corn for vegetarian versions.
- Binding for stuffing: a beaten egg with a touch of milk helps cheese and fillings hold together; for vegan options, use a vegan egg replacer or mashed potato.
- Coating options: all-purpose flour + egg wash + breadcrumbs mimics traditional batter; for gluten-free, use rice flour and gluten-free panko.
- Seasonings: cumin, smoked paprika, salt, pepper, and a squeeze of lime brighten the filling.
- Toppings and sauce: warm tomato salsa, crema (or Greek yogurt), fresh cilantro.
Ingredient notes:
- Salt the peppers lightly after roasting to season the interior.
- If using a delicate cheese only, add a small amount of shredded firmer cheese to prevent an overly gooey leak during slicing.
Equipment needed
- Baking sheet and wire rack (rack lifts peppers so heat circulates and coating crisps).
- Sharp knife and small spoon for hollowing.
- Mixing bowl for batter and fillings.
- Ovenproof dish for finishing with sauce if desired.
- Instant-read thermometer helps check interior temperature of meat fillings.
Step-by-step baking technique
- Roast and peel (optional): Roast whole peppers under a broiler or directly on a gas flame until skin blackens. Transfer to a bowl covered with plastic or a paper bag for 10 minutes, then peel off loose skin. This step reduces bitterness and improves texture.
- Hollow peppers: Make a lengthwise slit and remove seeds and membranes while keeping the stem intact if you want a presentation handle.
- Prepare filling: Cook any meat until just done, then combine with sautéed aromatics, spices, and part of the cheese. Let the mixture cool slightly so it binds.
- Stuff generously: Spoon the filling into each pepper without overpacking—leave space for cheese expansion.
- Coat for crunch: Dredge in flour, dip in beaten egg (or substitute), then press into breadcrumbs. For a lighter crust, brush with olive oil instead of deep frying.
- Bake: Place on a wire rack over a sheet pan at 400°F (205°C) for 18–25 minutes until coating is golden and cheese inside melts. Use a probe thermometer: meat-based fillings should reach safe internal temps (e.g., 160°F for ground beef/pork).
- Broil to finish: For extra color, broil 1–2 minutes—watch closely to prevent burning.
- Rest 3–5 minutes so cheese settles, then garnish and serve.
Timing, temperatures, and batch tips
- Preheat oven fully to ensure even browning.
- For stuffed peppers straight from refrigerator, add 5–8 minutes to bake time.
- When baking in batches, keep finished peppers warm in a low oven (200°F) to retain crispness.
- If making ahead, assemble and chill without final coating; coat and bake right before serving for best texture.
Pro tips for perfect results
- Dry peppers well after peeling so coating adheres.
- Chill stuffed peppers for 10–15 minutes before breading to firm the filling and reduce leakage.
- Use a combination of panko and finer breadcrumbs for the best crunch and adhesion.
- Avoid over-salting early; cheeses and sauces add salt at the end.
- For uniformly melted cheese, nestle an extra small piece of cheese in the top before coating.
- To avoid soggy bottoms, bake on a rack rather than directly on a sheet pan.
Storage, reheating, and make-ahead tricks
- Refrigerate leftover peppers in an airtight container for up to 3 days. Reheat in a 375°F oven on a rack for 10–12 minutes to restore crispness.
- Freeze fully baked pieces wrapped in foil and placed in a freezer bag for up to 2 months. Reheat from frozen at 375°F for 20–25 minutes.
- For meal prep, prepare filling and roasted peppers separately. Stuff and coat right before baking to preserve texture.
Pairings and serving suggestions
- Serve with a bright tomato-based salsa or a roasted tomatillo sauce and a dollop of crema or Greek yogurt.
- Offer simple sides like cilantro-lime rice, a crisp salad, or grilled corn.
- For a vegetable-forward plate, complement the peppers with cheesy baked cabbage steaks, which balance richness with hearty greens.
Variations to match diets and flavors
- Vegetarian: Replace meat with a mix of black beans, roasted corn, and quinoa; season assertively.
- Vegan: Use vegan cheese and a chickpea flour batter; bake until golden and set.
- Low-carb: Skip breadcrumbs and use a Parmesan crust or almond flour for coating.
- Spicy: Mix chopped jalapeño or chipotle into the filling, or brush exterior with a hot sauce glaze before baking.
- International twists: Add chorizo and manchego for Spanish influence, or swap spices for cumin and coriander for a Southwestern profile.
Common mistakes and how to avoid them
- Soggy coating: Bake on a rack, and make sure peppers are dry before breading.
- Cheese leaks: Chill stuffed peppers before breading and use a firmer cheese mix.
- Under-roasted peppers: Roast skins thoroughly to remove bitterness and to develop smoky flavor; partially peeled skins are fine if fully softened.
- Burned exterior before melted interior: Bake at the recommended moderate temperature and finish with a quick broil if needed.
- Overstuffing: Leave room for filling expansion and cheese melt to avoid bursting seams.
Frequently asked questions
What peppers work best?
- Poblano peppers offer the classic balance of size, flavor, and heat. Anaheim or cubanelle are good milder alternatives.
Can I skip roasting the skin?
- Yes, but roasted-and-peeled peppers are less bitter and more tender. If you skip roasting, choose younger, thinner-skinned peppers.
How do I keep them from falling apart when serving?
- Use a snug but not overpacked filling, let the baked peppers rest briefly, and serve with a spatula to support the base.
Is there a good gluten-free coating?
- Rice flour plus crushed gluten-free panko or finely ground cornflakes creates a crisp, gluten-free crust.
Can this be made ahead for a party?
- Prepare fillings and roast peppers the day before. Assemble and bake shortly before guests arrive for best texture.
Final note: This oven approach creates reliably delicious stuffed peppers with less oil and easier timing than frying, while still delivering the melty cheese and satisfying crunch expected from the classic preparation.